

by Seamster Seamster

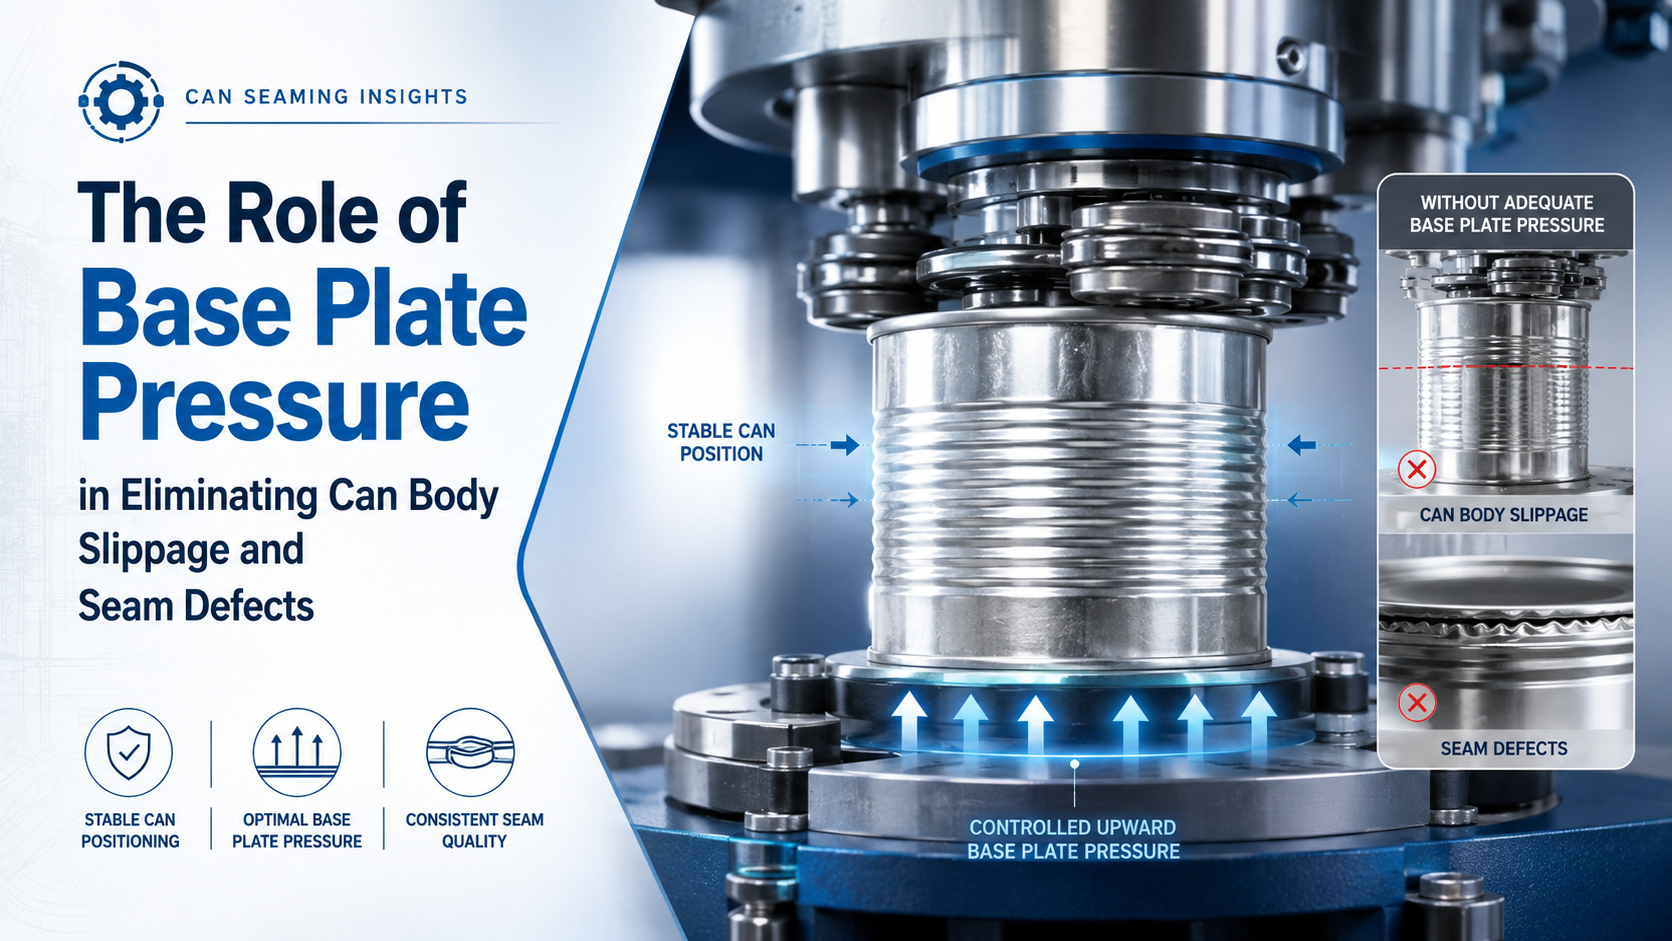
The Role of Base Plate Pressure in Eliminating Can Body Slippage and Seam Defects

Intro

In the pursuit of a perfect double seam, engineers and operators frequently focus on the profile and alignment of the first and second operation seaming rollers. While roller configuration is critical, the foundation of a structurally sound seam actually rests below the can. Base plate pressure (often referred to as lifter pressure) is the vertical force that clamps the can body firmly against the seaming chuck.

If this pressure is incorrectly calibrated, it introduces a cascade of subtle mechanical failures—most notably can body slippage—which completely compromises seam dimensions and shelf-life integrity.

Why Base Plate Pressure Controls the Entire Seaming Operation

The seaming chuck acts as an anchor, holding the can lid (end) in place while the rollers exert intense lateral force to fold the metal. However, the chuck does not drive the rotation of the can body on its own; it relies on the vertical friction generated by the base plate.

When the lifter lifts the can into the chuck, it creates a tight friction-lock. This vertical clamping force must achieve two critical objectives:

  1. Prevent Rotation Differential: It ensures the can body, lid, and seaming chuck rotate as a single, synchronized unit when the rollers make contact.

  2. Drive Metal Flow: It provides the upward resistance necessary to force the tinplate or aluminum into the chuck lip, ensuring the proper formation of the cover hook and body hook.

The Danger Zone: What Happens When Pressure is Too Low?

When base plate pressure falls below the machine’s engineering specifications, the lateral force of the first operation roller will physically overpower the vertical friction lock. This results in can body slippage.

[Roller Contacts Can] ---> (Lateral Force Overpowers Friction) ---> [Can Body Slows Down / Spins on Chuck]

Because the can body momentarily stops or slows down while the seaming head continues to spin, the metal is not driven correctly into the tooling. This causes specific, repeatable defects:

  • Short Body Hooks: Without sufficient upward force, there isn’t enough metal driven into the top of the seam to form a complete body hook, leading to a critical drop in seam overlap.

  • False Seams: In severe cases of slippage, the roller pushes the cover hook entirely past the body hook without interlocking them at all.

  • Vee Defects & Loose Seams: The skipping action caused by slippage leaves sections of the first operation fold unevenly tucked, manifesting as visual drooping or wrinkles under the seam.

The Inverse Problem: Excessive Lifter Pressure

More pressure isn’t always better. Cranking up the base plate force beyond recommended tolerances introduces a separate set of engineering failures:

  • Mushroomed Can Flanges: For thin-walled aluminum or light tinplate cans, excessive vertical force can crush or buckle the can neck or flange before the rollers even begin their sweep.

  • Chucked Rims / Fractured Ends: Extreme pressure forces the chuck too deeply into the lid well, which can score the internal protective coating or split the metal along the chuck line.

  • Accelerated Bearing Wear: The constant, excessive vertical load places undue stress on the lifter and spindle bearings, drastically shortening your machine’s maintenance cycles.

Engineering Calibration: Finding the Sweet Spot

To prevent slippage without causing structural damage, base plate pressure must be tailored to your specific can material, diameter, and wall thickness.

Material Type Pressure Characteristics Primary Risk Factor
Heavy Tinplate (Food Cans) Requires higher vertical force to deform thicker steel. Short body hooks if pressure drops.
Thin-Wall Aluminum (Beverage) Requires precise, lower pressure thresholds. Body buckling or paneling under high loads.

How to Check for Slippage on the Line

  1. The Visual Polish Test: Inspect the base of a completed can. If you notice a bright, polished circular ring on the bottom where it sat on the lifter plate, it indicates the can spun against the plate during seaming due to inadequate pressure.

  2. The Seam Impression Check: Examine the inside of the lid well. A smooth, clean impression means a solid lock. A torn or heavily scuffed chuck impression indicates the chuck was spinning independently of the lid and body.

Operational Checklist for Maintenance Teams

To maintain consistent seam integrity across high-volume production runs, integrate the following steps into your changeover or daily verification procedures:

  • [ ] Verify Spring/Pneumatic Calibration: For mechanical lifters, check spring tension using a calibrated force gauge. For modern pneumatic systems, ensure line pressure matches the specific recipe configuration.

  • [ ] Inspect Plate Alignment: Ensure the base plate is perfectly concentric with the seaming chuck. Parallel misalignment causes uneven pressure distribution, mimicking low-pressure defects on one side of the can.

  • [ ] Clean Contour Matching: Inspect the lifter plate for debris, oil, or product spillages that reduce friction coefficients. Ensure the plate profile exactly matches the profile of the can base.

By treating base plate pressure with the same engineering scrutiny as roller profiles, packaging facilities can eliminate a massive percentage of mystery leaks and maintain crisp, mathematically perfect double seams.

Need help optimizing your seaming setup or tooling?
Our team can help you achieve consistent seam quality.

View our Can Seaming Machines
Contact us for expert guidance
by Seamster Seamster

Automatic vs Semi-Automatic Can Seamers: Engineering & ROI Comparison

Introduction

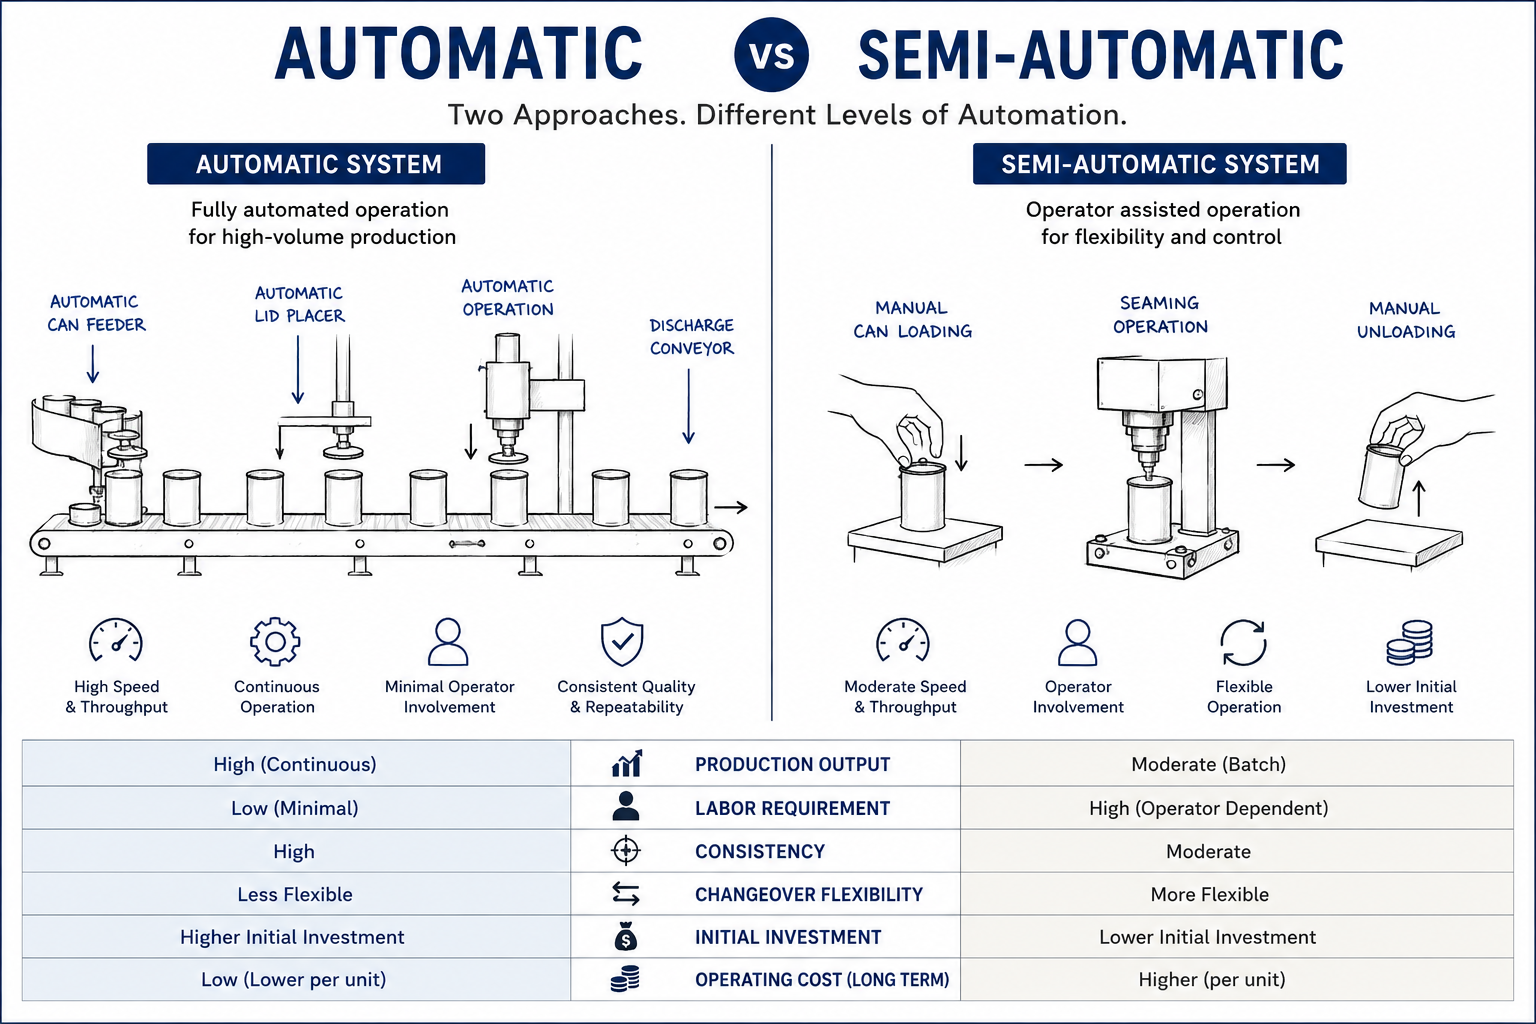
Choosing between an automatic and semi-automatic can seaming machine is one of the most important decisions in a packaging line. While both systems perform the same fundamental operation, their engineering design, production capability, labor requirements, and long-term economics differ significantly.

The right choice depends not only on production volume, but also on operational consistency, labor availability, maintenance requirements, and future scalability.


What is a Semi-Automatic Can Seamer?

In a semi-automatic system:

  • The operator manually places the can
  • Loading and unloading are partially manual
  • The machine performs the seaming cycle automatically

These machines are commonly used for:

  • Small to medium production volumes
  • Product testing and pilot runs
  • Specialty or niche products
  • Flexible production environments

What is an Automatic Can Seamer?

In an automatic system:

  • Cans are automatically fed
  • Lids are automatically placed
  • Seaming occurs continuously with minimal operator involvement

These systems are designed for:

  • High-volume production
  • Continuous industrial operation
  • Reduced labor dependency
  • Consistent throughput

Engineering Comparison

1. Production Throughput

Semi-Automatic

  • Lower output rates
  • Output depends greatly on operator speed and efficiency
  • Suitable for batch production

Automatic

  • Continuous production
  • Significantly higher throughput
  • Stable cycle consistency

2. Consistency of Seam Quality

Semi-Automatic

Operator handling introduces variation in:

  • Can positioning
  • Loading consistency
  • Feeding alignment

Automatic

Automated feeding improves:

  • Repeatability
  • Positional accuracy
  • Seam consistency

This becomes especially important at higher production volumes.


3. Machine Rigidity & Dynamic Stability

Automatic seamers generally operate at:

  • Higher speeds
  • Higher cyclic loads
  • Greater dynamic forces

As a result:

  • Structural rigidity
  • Shaft alignment
  • Bearing quality
  • Vibration control

become significantly more critical in automatic systems.


4. Labor Requirement

Semi-Automatic

Requires:

  • Continuous operator involvement
  • Higher labor dependency

Automatic

Reduces:

  • Manual handling
  • Operator fatigue
  • Production interruptions

5. Changeover Flexibility

Semi-Automatic

Often easier for:

  • Small batch variation
  • Experimental production
  • Frequent size changes

Automatic

Can require:

  • More extensive tooling adjustments
  • Setup time during format changes

However, modern automatic systems increasingly support faster changeovers.


ROI Comparison

Initial Investment

Semi-Automatic

  • Lower upfront cost
  • Lower entry barrier

Automatic

  • Higher capital investment
  • More advanced systems

Operating Cost

Automatic machines often reduce:

  • Labor cost
  • Rejection rates
  • Downtime
  • Production variability

Over time, this can offset the higher initial investment.


Cost of Inconsistency

At larger production scales, even small seam variations can result in:

  • Product rejection
  • Leakage
  • Shelf-life issues
  • Increased inspection cost

Automated systems help reduce these risks through repeatability and process stability.


When Should You Choose a Semi-Automatic Machine?

A semi-automatic machine is typically suitable when:

  • Production volume is moderate
  • Product variety is high (very frequent size changeovers)
  • Budget is limited
  • Flexibility is more important than throughput

When Should You Choose an Automatic Machine?

An automatic system becomes more suitable when:

  • Production demand is high
  • Labor dependency must be reduced
  • Consistency is critical
  • Long-term scalability is required

Engineering Perspective

The decision should not be based solely on speed.

The real considerations are:

  • Process stability
  • Structural rigidity
  • Repeatability
  • Long-term operational efficiency

A properly engineered automatic machine offers advantages far beyond production output alone.


Conclusion

Both automatic and semi-automatic seamers have valid applications. The correct choice depends on production goals, operational scale, labor strategy, and quality requirements.

Selecting the right system ensures not only productivity, but also long-term consistency and reliability.

Need help optimizing your seaming setup or tooling?
Our team can help you achieve consistent seam quality.

View our Can Seaming Machines
Contact us for expert guidance
by Seamster Seamster

Seaming Tolerances & Measurement in Can Seaming (Engineering Guide)

Intro

In can seaming, achieving a visually acceptable seam is not sufficient. The integrity of the seam must be verified through precise measurement and adherence to defined tolerances.

Even small deviations in seam parameters can compromise product safety, shelf life, and compliance standards.


Key Seam Parameters

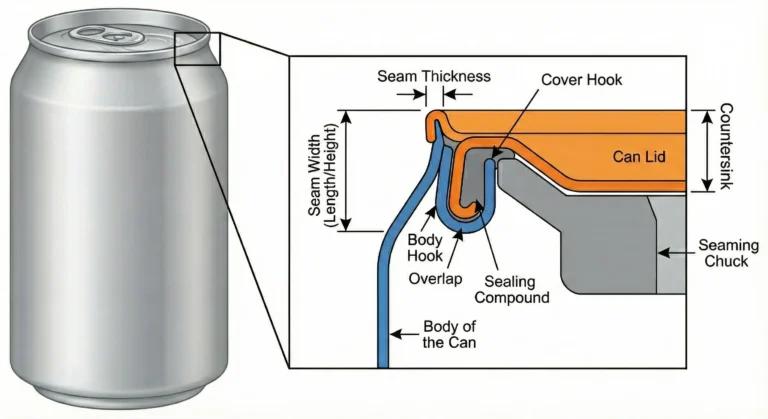
A proper double seam is defined by measurable parameters:

  • Seam thickness
  • Seam width
  • Body hook
  • Cover hook
  • Overlap
  • Tightness

These must fall within controlled tolerance ranges.


1. Seam Thickness

Definition:

Total thickness of the formed seam.

Importance:

  • Indicates compression quality
  • Too high → loose seam
  • Too low → over-compression

2. Seam Width

Definition:

Overall width of the seam.

Importance:

  • Affects structural strength
  • Must match tooling design

3. Body Hook & Cover Hook

Definition:

  • Body hook: portion of can body folded into seam
  • Cover hook: portion of lid folded into seam

Importance:

  • Determines interlocking strength
  • Directly affects seam integrity

4. Overlap

Definition:

Extent of interlock between body hook and cover hook

Importance:

  • Critical for hermetic seal
  • Insufficient overlap → leakage risk

5. Seam Tightness

Definition:

Degree of compression within seam layers

Importance:

  • Loose seam → contamination risk
  • Over-tight seam → material damage

Typical Tolerance Ranges

(You can adjust based on your experience)

  • Seam thickness: controlled within narrow limits
  • Seam width: consistent across batches
  • Overlap: typically 45–75%

Exact values depend on:

  • Can size
  • Material
  • Application

Measurement Methods

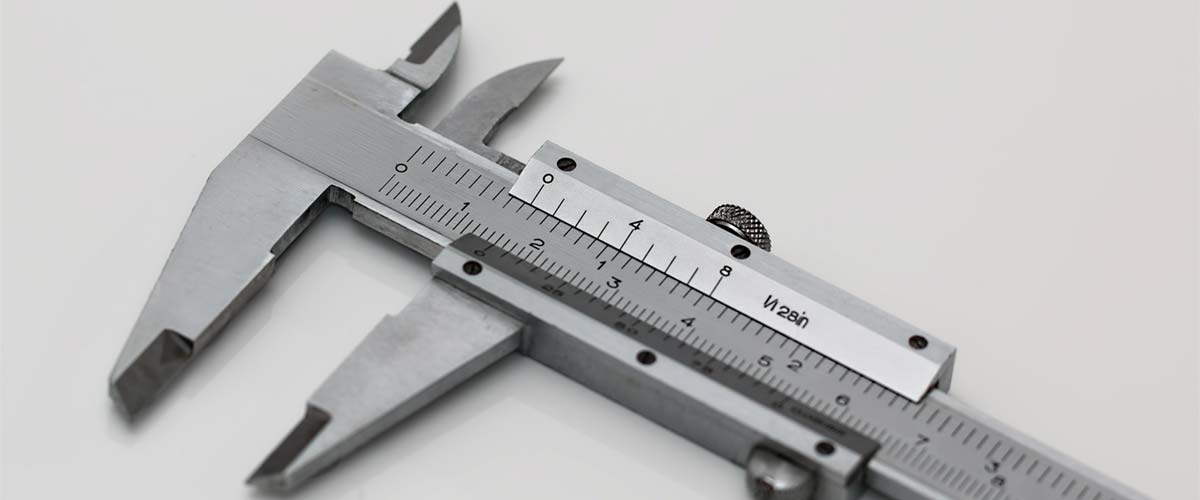
1. Seam Micrometer

  • Used to measure seam thickness and width

2. Seam Tear-Down Analysis

  • Cut seam cross-section
  • Measure hook lengths and overlap

3. Optical Measurement

  • Projectors / digital systems for precision

Common Measurement Errors

  • Incorrect sampling
  • Improper cutting technique
  • Tool wear affecting readings

Why Tolerances Drift in Production

Even if setup is correct, variations can occur due to:

  • Machine deflection
  • Tool wear
  • Material variation
  • Operator adjustments

This is why continuous monitoring is critical.


Engineering Perspective

Seaming tolerances are not standalone.

They depend on:

  • Machine rigidity
  • Roller profile
  • Setup accuracy

A stable system ensures repeatable results.


When to Investigate Further

Take corrective action if:

  • Measurements vary across batches
  • Overlap is inconsistent
  • Thickness fluctuates

Conclusion

Maintaining seam tolerances is essential for product quality and reliability. Proper measurement, regular monitoring, and a stable machine setup ensure consistent and compliant seam performance.

Need help optimizing your seaming setup or tooling?
Our team can help you achieve consistent seam quality.

View our Can Seaming Machines
Contact us for expert guidance
by Seamster Seamster

How Machine Rigidity Affects Seam Quality in Can Seaming

Intro

In can seaming, much attention is given to tooling, setup, and operator skill. However, one of the most critical and often overlooked factors affecting seam quality is machine rigidity.

Even with correct roller profiles and setup parameters, a lack of structural rigidity can result in inconsistent seams, increased defects, and reduced tooling life.


What is Machine Rigidity?

Machine rigidity refers to the ability of the seaming machine structure to resist deformation under operational loads.

During seaming:

  • High radial and axial forces are applied
  • Rollers exert pressure on the can and lid
  • Dynamic loads fluctuate at high speeds

A rigid machine maintains dimensional stability under these conditions.


Forces Involved in Can Seaming

During the first and second operations:

  • Roller pressure creates radial compression forces
  • Chuck interaction introduces axial loads
  • Rotational movement generates dynamic vibration forces

These forces act simultaneously and repeatedly during production.


What Happens in a Low-Rigidity Machine

If the machine structure flexes:

1. Inconsistent Seam Thickness

  • Micro deflections change roller position
  • Leads to variation in seam dimensions

2. Poor Hook Formation

  • Misalignment affects body hook and cover hook engagement

3. Increased Defects

  • False seams
  • Loose seams
  • Wrinkling

4. Vibration-Induced Issues

  • Amplified vibration reduces precision
  • Affects high-speed performance

5. Accelerated Tool Wear

  • Uneven load distribution damages rollers and chucks faster

Why Rigidity Becomes Critical at Higher Speeds

At higher RPM:

  • Dynamic forces increase significantly
  • Even small deflections get amplified
  • Tolerances become tighter

👉 A machine that performs well at low speed may fail at high production rates due to insufficient rigidity.


Key Factors That Influence Machine Rigidity

1. Frame Design

  • Cast vs fabricated structure
  • Section thickness
  • Structural geometry

2. Material Selection

  • Higher modulus materials reduce deflection

3. Bearing and Shaft Design

  • Precision bearings reduce play
  • Shaft stiffness prevents misalignment

4. Assembly Precision

  • Poor assembly introduces inherent misalignment

Rigidity vs Adjustment

Many operators try to compensate for poor seam quality by:

  • Increasing roller pressure
  • Re-adjusting settings

However:
These are temporary fixes.

If the root cause is structural flex, adjustments cannot ensure consistency.


Machine + Tooling + Setup = System

Seam quality depends on:

  • Machine rigidity
  • Roller profile
  • Proper setup

Weakness in any one affects the entire system.


Practical Indicators of Poor Rigidity

You may have a rigidity issue if:

  • Seam quality varies across batches
  • Frequent re-adjustments are required
  • Tooling wear is unusually high
  • Performance drops at higher speeds

Conclusion

Machine rigidity is a foundational requirement for consistent seam quality. Investing in a structurally sound machine ensures stability, reduces defects, and improves long-term performance.

Need help optimizing your seaming setup or tooling?
Our team can help you achieve consistent seam quality.

View our Can Seaming Machines
Contact us for expert guidance
by Seamster Seamster

Why Seam Roller Profiles Matter in Can Seaming (And How They Affect Seam Quality)

In can seaming, tooling is often overlooked in favor of machine selection. However, one of the most critical factors affecting seam quality is the roller profile.

Even with a well-built machine, incorrect roller geometry can lead to inconsistent seams, increased wear, and product rejection.

What is a Roller Profile?

The roller profile refers to the shape and contour of the seaming rollers used during the first and second operations.

These rollers determine how:

  • The cover hook
  • The body hook

are formed and interlocked.

First Operation vs Second Operation Rollers

First Operation:

  • Forms initial hook
  • Brings lid and body together

Second Operation:

  • Tightens and irons seam
  • Ensures hermetic seal

 Each requires a different roller profile

How Roller Profile Affects Seam Quality

1. Seam Tightness

Incorrect profile → loose or over-tight seam


2. Wrinkling

Improper contour → wrinkles in seam


3. Hook Formation

Poor geometry → weak interlocking


4. Tool Wear

Incorrect profile → faster wear, inconsistent results


Common Problems Caused by Incorrect Roller Profiles

  • False seams
  • Droop
  • Sharp seams
  • Inconsistent seam thickness

Why Standard Rollers Don’t Always Work

Many manufacturers use:

  • Generic roller profiles

But these may not match:

  • Material thickness
  • Can diameter
  • Product requirements

Importance of Customization

Optimizing roller profiles based on:

  • Material type
  • Can size
  • Production speed

Leads to:

  • Better seam integrity
  • Lower rejection rates
  • Longer tooling life

Machine + Tooling = System

A high-quality machine alone is not enough.

Seam quality depends on:

  • Machine rigidity
  • Roller design
  • Proper setup

Conclusion

Roller profiles are one of the most critical yet underappreciated aspects of can seaming. Investing in the right tooling and setup can significantly improve seam consistency and reduce production issues.

Need help optimizing your seaming setup or tooling?
Our team can help you achieve consistent seam quality.

View our Can Seaming Machines
Contact us for expert guidance
by Seamster Seamster

Automatic vs Semi-Automatic Can Seaming Machines – Which is Better?

Choosing between automatic and semi-automatic can seaming machines depends on your production needs, budget, and operational scale.

Automatic Can Seaming Machines

Automatic seamers are designed for high-speed production lines. They offer consistent performance, minimal manual intervention, and high output rates.

Semi-Automatic Can Seaming Machines

Semi-automatic machines require manual loading but are more flexible and cost-effective for smaller operations.

Key Differences

  • Speed: Automatic machines are faster
  • Cost: Semi-automatic machines are more affordable
  • Labor: Automatic machines require less manual work

Conclusion

The right choice depends on your production volume and operational goals.

Looking for a reliable can seaming machine? Contact us today to discuss your requirements.